Dirt Bike Magazine - Best selling off road motorcycle magazine
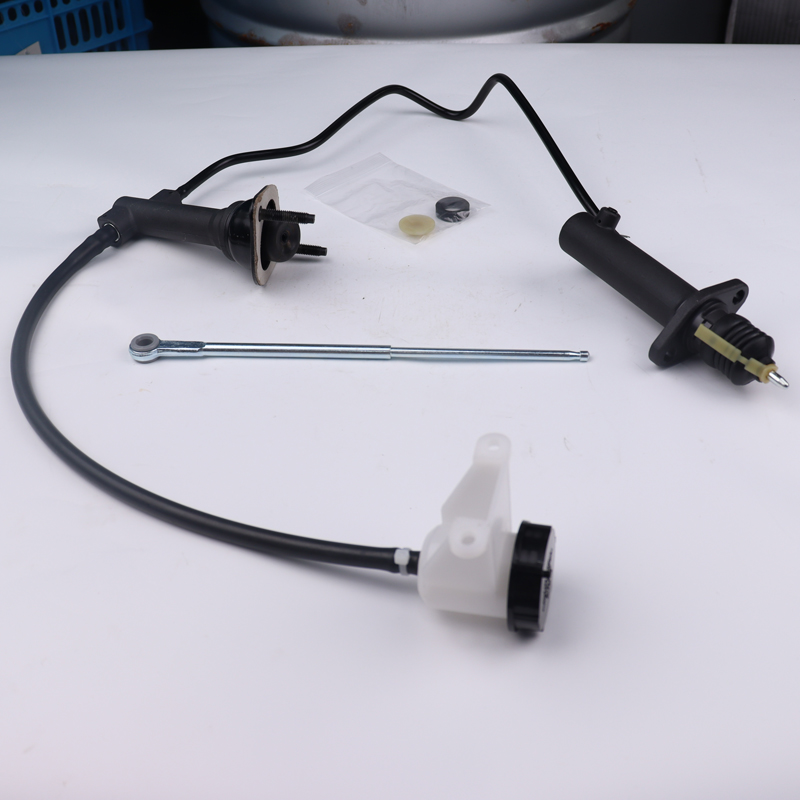
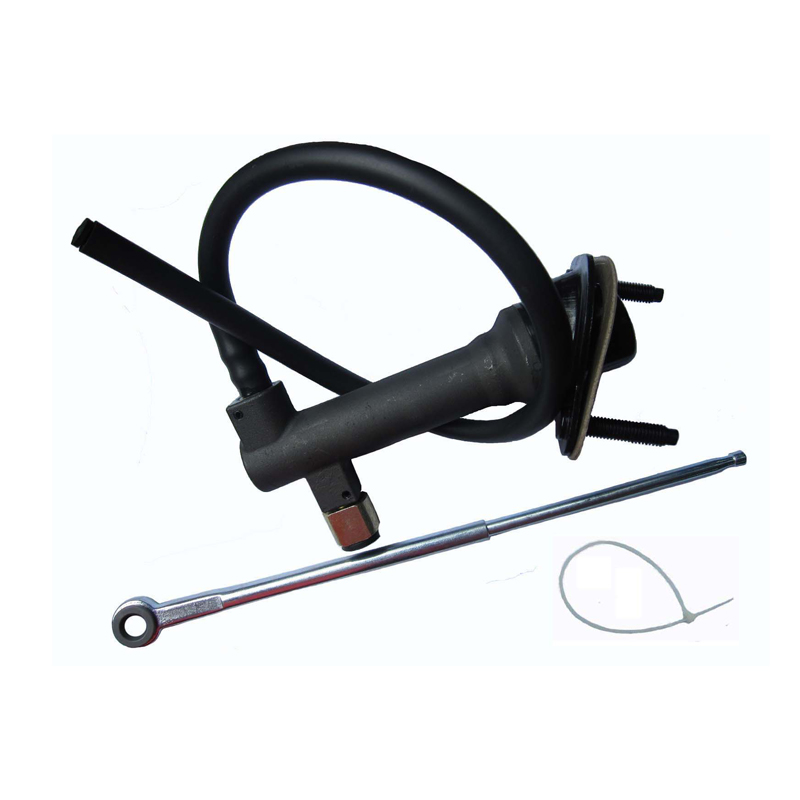
I have a 2012 KTM 500EXC and love it! But, I’m having issues with the clutch. I keep losing the handle. It’s like there is air in the line. It eventually comes back somewhat. I’ve kept the master cylinder filled, and I’ve tried bleeding it, but to be honest, I think I made it worse! Any tips would be greatly appreciated! Mustang Clutch Reservoir
We dialed up Alec Morefield from Slavens Racing for their input on dealing with the hydraulic clutch issue. Here’s his sage advice:
Due to the age of your motorcycle, your master cylinder and/or slave cylinder most likely need to be rebuilt. Bikes that sit and do not get ridden often or just long in the tooth typically require a rebuild kit to fix your problem. These kits come with the necessary seals and O-rings to properly rebuild your master cylinder and slave cylinder. After using a rebuild kit, you will want to follow the same bleeding procedure as stated below. Before ordering a rebuild kit, you can try the reverse bleeding procedure to ensure you don’t just have air in your line.
Reverse bleeding the clutch line and clutch master cylinder is really an elementary task. Rekluse makes a clutch bleeding kit that will properly bleed your clutch. Before you start this process, make sure you have a bleeding kit (like the Rekluse unit) and the proper fluid. Most KTM, Husqvarna and GasGas models use brake fluid DOT 4 or 5.1, but some older KTMs take mineral oil. Simply look at the cap on top of your master cylinder and it will tell you what kind of fluid to use. If you have aftermarket caps on your master cylinder, refer to your owner’s manual to ensure you use the proper fluid. Using the wrong fluid will result in you having to replace/rebuild your master cylinder and slave cylinder.
Next, remove the cap, and we recommend wrapping the master cylinder with a shop towel to absorb the brake fluid/mineral oil that will slosh out once the process begins. To begin reverse bleeding your clutch, you will want to start down on the slave cylinder. Before you hook the bleeder kit (syringe and clear line) up to the bleed screw on the slave cylinder, fill your syringe up with the proper fluid. Take the time to push out all the air bubbles in your syringe. Once your syringe is filled, remove the rubber cap off the bleed screw on the slave cylinder. Then, before hooking the syringe to the bleed screw, make sure you loosen the bleed screw. Next, put the syringe/line on the bleed screw and slowly push the fluid up from the slave through the clutch line and out the master cylinder. Keep pushing the fluid through and allow the towel to absorb the overflow of the fluid (or bucket to catch the fluid) until you no longer see air bubbles in the master cylinder. You may need to work the lever a little bit to see if you get anymore bubbles, and make sure you keep pressure on the syringe while doing so. If you are getting some more air bubbles, you might have to go through this process two or three times. Once you no longer have any air bubbles, tighten down the bleed screw on the slave cylinder and remove the syringe from the bleed screw. Now, you should check and see what your lever feels like; if it’s good, reinstall your cap on your master cylinder, and clean the master cylinder and slave cylinder off with a brake-parts cleaner. Now, you are ready to ride!
I have a six-year-old Husqvarna FE450, and it is the best machine I have owned (and I’ve purchased 23 machines over the years!), but my question has nothing to do with it. Because I’m a dual-sporter, I want to steer clear of getting flats on long rides. Carrying a tube and CO2 cartridges, along with a pack of tools, is flat painful. I’ve been running bib mousses with good results until last weekend. They’re a pain to mount, and my last effort was the toughest yet. I had a new Nitromousse and was sticking it in an IRC M5B. I had to muscle it in, as the bead was so tight that I could barely get a tire iron in. I finally rammed it on. We had a big ride set up and trucked our bikes to the location, got dressed, and I made it less than 20 miles when the foam tube popped out of the tire and got rammed into the swingarm.
The tire looks perfect, as it was brand new. This turned my day into a nightmare! What happened?
Harry, here’s some sage advice about bib-mousse installation. First, make certain that your foam insert is the proper size for your tire. There is no doubt in my incredibly organized brain bucket that either the insert was too big or your tire was too small for the mousse. You actually broke the bead on the tire during installation, and this is what let go on your ride. Once the bead is broken, it will jump off the rim, and this let the foamer balloon out of its nest.
In the future, be smarter than the tire. If you can’t keep the bead dropped below the rim during the last 10 inches of the installation, and you use a long tire iron for leverage, you can snap the bead quite easily. I use Motion Pro’s Bead Buddies (two is the minimum, while three to four keeps the bead dropped below the rim properly), take small bites with the tire iron and work slowly. Done properly, and with the right-sized mousse, the task is quite pedestrian. Now, good luck, and we’re all counting on you!
I’ve just put a down payment on a new GasGas ES500. Will the suspension lowering linkage by AltRider fit the GasGas? Are there other lowering options? What will I need to do to the forks to level it out? Price is a factor. Please help an old guy who has been reading your advice for 40-plus years. Thank you.
If lowering just the rear end works for you, then the AltRider’s variableheight suspension lowering linkage can lower your seat height to four different heights: 4.5mm (0.2 inches), 16mm (0.6 inches), 27mm (1 inch) or 38mm (1.5 inches) lower than factory height. I have an issue since both ends should be lowered equally so that the balance of the machine stays integral. I questioned Dick Wilk, whom I trust with suspension counsel, and he works on the theory that the fork and shock work in unison so the machine’s spacers fit internally to shorten the travel. Dick says that most go 1 to 2 inches, and both dampers can be brought back to stock without much trouble. He did say that the fork springs need to be shortened as well. The AltRider (www.altrider.com) lowering linkage sells for $235, and the Dicks Racing (www.dicksracing.com) modifications will set you back $495.
Dirt Bike P.O. Box 957
THE WEEKLY FEED: ICONIC MOTO • COOL VIDS • CHRISTMAS GEAR BAG
EVO BIKE SPOTLIGHT: 1995 YAMAHA YZ250
FIRST RIDE–2024 HUSQVARNA FE350S DUAL-SPORT: THE WRAP
China Hydraulic Clutch Slave Suppliers THE WEEKLY FEED: NEW YEAR CHEERS • MAXIMUM MOTO • TORSTEN HALLMAN BITD